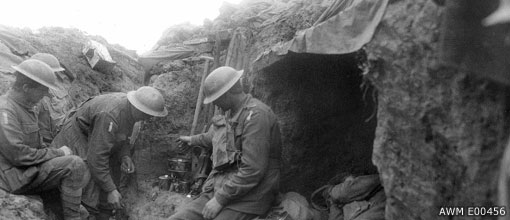
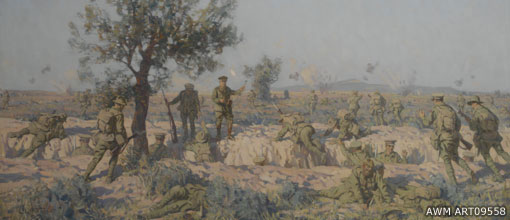
Menu Coat of Arms AWM London
  • The Wall
    • About the Wall
    • Some Useful Links
    • Privacy Policy
  • Wall Search
  • Search for your town
  • Theatres of War
    • All Theatres
    • Amiens
    • Atlantic
    • Bardia
    • Beersheba
    • Berlin
    • Bismarck Sea
    • Borneo
    • Bougainville
    • Brallos Pass
    • Bullecourt
    • Cocos Keeling
    • Coral Sea
    • Crete
    • Damascus
    • Darwin
    • El Alamein
    • Fromelles
    • Gallipoli
    • Gaza
    • Imphal
    • Indian Ocean
    • Kokoda
    • Krithia
    • Lingayen Gulf
    • Lone Pine
    • Markham Ramu
    • Mediterranean
    • Megiddo
    • Mesopotamia
    • Messines
    • Milne Bay
    • Mont St Quentin
    • Normandy
    • Okinawa
    • Passchendaele
    • Polygon Wood
    • Pozières
    • Rabaul
    • Ruhr
    • Savo Island
    • Singapore
    • Sunda Strait
    • The North Sea
    • Tobruk
    • Villers Bretonneux
    • Wewak
    • Ypres
  • First World War
  • Second World War
  • Theatres of War
Coat of Arms

The Australian War Memorial, London

This memorial commemorates the service men and women who served in the First World War and Second World War by listing the names of the towns in which they were born. Superimposed on the 23,844 town names are 47 of the many battles in which they fought and made the ultimate sacrifice for their country, Australia.

Close Search the Wall

Instructions

This page shows a panorama of the wall, you can pan, zoom, search for a town name or get information on individual battles.

  • To pan simply drag along the wall
  • To zoom in and out you can click the + and - buttons or by scrolling using a mouse or trackpad or by pinching on a touch screen device.
  • To search for a town, either click the magnifying glass icon on the left and enter the town name or click the Wall Search in the drop down menu along the top of the page.
  • To get more information about a battle on the wall, simply click the battle name and it will pop up with a brief overview of the battle. You can then choose to read more about that battle which may also include imagery and footage from the battle.
Close
Close

Amiens

Breaking Through the Trenches 1918

Amiens intro picture
The Battle of Amiens began on 8 August 1918. It was the opening phase of the Allied offensive known as the Hundred Days Offensive, marking the end of trench warfare on the Western Front and ultimately leading to the end of World War I. Allied forces made significant breakthroughs at Amiens with the Australians advancing over seven miles on the first day.
Read More ›

Atlantic

The Flying Porcupines 1939-45

Atlantic intro picture
From their base at Mount Batten, Plymouth, Australians of No. 10 and 461 Squadrons RAAF spent most of the Second World War in a desperate battle to keep Britain supplied with food and war materials. The ongoing struggle was fought mainly against German submarines, which posed a constant threat to the supply lines that connected Britain to overseas markets.
Read More ›

Bardia

Prelude to Tobruk 1941

Bardia intro picture
The capture of Bardia on 3 January 1941 was the first land battle fought by Australian soldiers in the Second World War, and their first victory. The heavily-fortified Italian seaport on the eastern coast of Libya was taken by men of the Australian 6th Division in an attack that began at 5:30am and broke the first line of Italian defence just half an hour later. 130 Australian soldiers lost their lives and another 326 were wounded in the capture of Bardia.
Read More ›

Beersheba

The Charge of the 4th Light Horse 1917

Beersheba intro picture
On 31 October 1917, Australian horsemen of Brigadier General William Grant's 4th Light Horse Brigade captured the Turkish stronghold of Beersheba in Palestine. Their fearless actions, which resulted in the breaking of the heavily-defended Gaza-Beersheba line, was later described by historians as "the last successful cavalry charge in history."
Read More ›

Berlin

Australians in the Battle of Berlin 1943-44

Berlin intro picture
The Battle of Berlin was fought between November 1943 and March 1944 and was the longest, most sustained offensive by the Royal Air Force's Bomber Command against a single target. Many Australian pilots flew in the Battle of Berlin, and a number were shot down in enemy territory.
Read More ›

Bismarck Sea

The Battle of the Bismarck Sea 1943

Bismarck Sea intro picture
Not to be confused with the German battleship Bismarck that was sunk in the Atlantic Ocean in May 1941, The Battle of the Bismarck Sea was an important Allied victory fought against the Imperial Japanese Navy on 2-3 March 1943 off the north coast of New Guinea.
Read More ›

Borneo

The End in the Pacific 1945

Borneo intro picture
For three months in 1945, the island of Borneo was the scene of fierce fighting involving Australian troops in the liberation of British and Dutch Borneo. Borneo was occupied by the Japanese in early 1942 and between 1942 and 1943 a large number of Allied prisoners of war, including many Australians, were sent there and would take part in the infamous Sandakan “death marches” conducted by the Japanese.
Read More ›

Bougainville

Isolating Rabaul 1944-45

Bougainville intro picture
Occupied by the Japanese in 1942, the small island outpost of Bougainville was strategically vital in defending the major Japanese naval base at nearby Rabaul. For the next three years the island would be hotly contested by first American then Australian troops, as the allies pursued their strategy of island hopping in isolating the main Japanese threat in the area.
Read More ›

Brallos Pass

Withdrawal from Greece 1941

Brallos Pass intro picture
When Hitler launched his invasion of Mainland Greece in November 1940, it was the Australian soldiers of the 6th and 7th Divisions, along with their comrades of the New Zealand Division, who were charged with the dangerous task of holding back the rapidly advancing German soldiers as the allies were forced to evacuate.
Read More ›

Bullecourt

Stalemate in the Trenches 1917

Bullecourt intro picture
The plan given to Australian commanders for the First Battle of Bullecourt (10-11 April 1917), relied on a "surprise concentration" of tanks that would lead the infantry advance without the support of artillery bombardment. In the event not all the tanks arrived and those that did were quickly knocked out. Amazingly, the Australian infantry broke into the strong defences of the Hindenburg Line, but not surprisingly they were unable to hold their gains.
Read More ›

Cocos Keeling

A First for the RAN 1914

Cocos Keeling intro picture
For two months late in 1914, a small German light cruiser, the Emden, proved to be a major thorn in the side of the Allied naval forces as it wreaked havoc among merchant vessels and warships alike in the Indian Ocean.
Read More ›

Coral Sea

The Rise of the Aircraft Carrier 1942

Coral Sea intro picture
In April 1942, intercepted signals alerted the US Navy that the Japanese would strike at Port Moresby in Papua and Tulagi in the southern Solomons. Two US carrier task forces, built around the USS Yorktown and the USS Lexington, rendesvoused off Espiritu Santo on 1 May in preparations for an attack, joined by Task Force 44 which included the heavy cruiser HMAS Australia and the light cruiser HMAS Hobart.
Read More ›

Crete

Defeat in Crete 1941

Crete intro picture
Crete, the largest and southernmost Greek island was strategically located in the eastern Mediterranean. Many British, Australian and New Zealand troops evacuated from Greece in April 1941 were landed at Crete while others were sent to Egypt. By mid May the 30,000 strong British garrison on Crete included 6,500 Australians. In addition, there were 10,000 mainly untrained and poorly armed Greek troops on the island.
Read More ›

Damascus

The Syrian Campaign 1918 & 1940-41

Damascus intro picture
In both world wars, Australian troops played an important role in entering Damascus. On 1 October 1918, the Australian Mounted Division rode into Damascus, signalling the defeat of the Ottoman Empire in the Middle East. Turkey signed an armistice with the Allies on 30 October, putting an end to the Allied campaign in the Middle East.
Read More ›

Darwin

Australia Under Attack 1942

Darwin intro picture
On 19 February 1942, mainland Australia came under attack for the first time when the Japanese launched two air raids on Darwin. The first attack of 188 naval aircraft at 9.58 am was from a Japanese fleet that included two battleships and four aircraft carriers that would invade Timor 24 hours later. The raid of Darwin was designed to hinder Darwin’s potential as a base to launch a counter-offensive and also to damage Australian morale.
Read More ›

El Alamein

Outfoxing the "Desert Fox" 1942

El Alamein intro picture
The 9th Australian Division played a pivotal role in British 8th Army’s battles from July and November 1942 to halt the German and Italian advance towards the Nile and then to decisively defeat and force them to retreat. After a lull in the desert fighting, Field Marshal Erwin Rommel launched an offensive on 26 May 1942 with the objective of capturing Tobruk which surrendered less than a month later on 21 June.
Read More ›

Fromelles

Disaster at Fromelles 1916

Fromelles intro picture
The attack on Fromelles on 19 July 1916 was the first major battle fought by Australian troops on the Western Front. It was a feint designed to prevent the Germans reinforcing their troops on the Somme, where the Allies had launched a major offensive on 1 July. The ruse, however, was unsuccessful and the disastrous results were later described by Brigadier General H.E. "Pompey" Elliott as a "tactical abortion".
Read More ›

Gallipoli

The Birth of a Nation 1915

Gallipoli intro picture
Gallipoli was the first major battle for the Anzacs and the new nation of Australia. The feats and the sacrifices of the Anzac soldiers are commemorated in Australia and New Zealand each year on the anniversary of the landings, the day that has become known as “Anzac Day”. In Australia, the day has also come to symbolise our sense of nationhood.
Read More ›

Gaza

The Turkish Stronghold in Palestine 1917

Gaza intro picture
In 1917 the coastal city of Gaza was the heart of the main Turkish defensive position in southern Palestine. The Allies made three attempts to capture the Turkish stronghold and open the way for an advance on Jerusalem. Finally in October, during the Third Battle of Gaza, Beersheba fell to the Australian Light Horse, allowing the British and dominion forces to outflank and undermine the security of the stronghold, which fell to the British on 7 November after little resistance.
Read More ›

Imphal

The Beginning of the Japanese Retreat 1944

Imphal intro picture
The Japanese captured most of Burma in early 1942 and British Indian Army supported by the Royal Air Force with some American and Chinese assistance fought for three and a half years to free the country in a campaign that lasted longer than any other British campaign of the Second World War. The turning point came with the defeat of the Japanese at Imphal and Kohima, in which many members of the RAAF served in RAF squadrons.
Read More ›

Indian Ocean

The Mystery of HMAS Sydney 1941

Indian Ocean intro picture
On 19 November 1941, HMAS Sydney was attacked off the coast of Western Australia by the German raider Kormoran, which was disguised as a Dutch merchant vessel. In the battle that followed, both vessels were severely damaged, and the Sydney was sunk. Of the Australian ship's 645 crewmembers, none survived, and the whereabouts of the ship's wreckage remained unknown until March 2008.
Read More ›

Kokoda

The Stuff of Legends 1942

Kokoda intro picture
The first Japanese attempt to seize Port Moresby was thwarted by the allied victory in the Battle of the Coral Sea in May 1942. The second attempt, an overland attack across the Owen Stanley Range via the Kokoda Track, commenced with Japanese troops landing at Gona on the eastern coast of Papua on 21 July 1942. The fighting that followed, between the Japanese invaders and Australian militiamen, and later infantry, has since become the stuff of legends, being one of the major Second World War battles remembered by Australians today.
Read More ›

Krithia

"Ours is Just to Do and Die" 1915

Krithia intro picture
Krithia was a Greek village on the tip of the Gallipoli peninsula, approximately eight kilometres north of Cape Helles, the site of the costly British landings of 25 April 1915. The village was at the foot of the dominating heights of Achi Baba peak which had been the first objective of the British troops on 25 April. In early May it was the scene of a costly defeat for the Allied forces on the peninsula.
Read More ›

Lingayen Gulf

Fight for the Philippines 1945

Lingayen Gulf intro picture
On 22 December 1941, the Japanese 14th Army under Lieutenant General Masaharu Homma landed at Lingayen Gulf on the north east coast of Luzon Island, the largest island in the Philippines. The Japanese forced the Americans and Filipino forces to retreat to the Bataan peninsula where they were besieged for nearly four months until a renewed Japanese offensive forced a surrender on 9 April 1942.
Read More ›

Lone Pine

A Famous Assault at Lone Pine 1915

Lone Pine intro picture
Lone Pine was an action that featured one of the most famous assaults of the Gallipoli campaign. The attack was planned as a diversion for the Australian and New Zealand units that were to breakout from the Anzac perimeter by capturing the heights of Chunuk Bair and Hill 971. At 5.30 pm on 6 August 1915, the Australian artillery barrage lifted and from concealed trenches in no man’s land the 1st Australian Brigade charged towards the Turkish trenches.
Read More ›

Markham Ramu

Driving Out the Japanese 1943-44

Markham Ramu intro picture
Following the recapture of Lae by Australians of the 9th Division, the next objective, to be carried out by the 7th Division, was the control of the combined Markham and Ramu River Valleys, a 185 kilometres long flat corridor hemmed in to the north and south by towering mountains.
Read More ›

Mediterranean

The Battle for the Mediterranean 1917-18 & 1940-43

Mediterranean intro picture
The Royal Australian Navy served in the Mediterranean in both world wars. In May 1917, Australian destroyers were sent to the Mediterranean for anti-submarine work. In the Second World War, naval activity in the Mediterranean Sea was a furious struggle by both sides to keep their armies supplied with the materials and reinforcements they needed. When Italy declared war in June 1940, HMAS Sydney, and five Australian destroyers were serving with the British Mediterranean Fleet, based at Alexandria, Egypt.
Read More ›

Megiddo

Allenby's Masterstroke 1918

Megiddo intro picture
By the end of 1917, the forces of the Egypt Expeditionary Force commanded by British General Sir Edmund Allenby were firmly in control of Jerusalem. However, the German spring offensive on the Western Front in March disrupted Allenby’s plans for an early resumption of operations in Palestine. Sixty thousand British troops including two divisions and twenty-two infantry battalions were sent to France as reinforcements. The British infantry divisions were restructured as Indian divisions and the 4th and 5th Cavalry Divisions, composed with British and Indian cavalry, were formed.
Read More ›

Mesopotamia

The Birth of the RAAF 1916

Mesopotamia intro picture
Shortly after the outbreak of war in 1914, the Australian Flying Corps (AFC), sent one aircraft to German New Guinea but the Germans surrendered before the aircraft could even be unpacked. On 8 February 1915, the Indian government requested air assistance from Australia. The AFC could only provide four officers and ground staff for what became known as the Mesopotamian Half-Flight or the Australian Half-Flight.
Read More ›

Messines

Prelude to Passchendaele 1917

Messines intro picture
For what became known as the Battle of Messines, the British prepared the most detailed plan ever for a major British offensive. Artillery targets were carefully plotted and an immense creeping barrage of artillery and machine-gun fire was designed to move ahead of the infantry. Huge models of the ground were built and studied by the troops, especially those in the Third Australian Division commanded by Major General John Monash.
Read More ›

Milne Bay

Breaking the Japanese Spell 1942

Milne Bay intro picture
On 25 June 1942 a company of American engineers landed at Milne Bay to construct an airstrip for a forward base for air strikes against Japanese positions in New Guinea. By mid-August 7,500 Australians and 1,400 Americans were at Milne Bay under the overall command of Major General Cyril Clowes. On 26 August, the Japanese landed and began their advance along the north shore of Milne Bay towards the Allied airstrips.
Read More ›

Mont St Quentin

The Finest Australian Feat 1918

Mont St Quentin intro picture
From the Battle of Amiens on 8 August 1918 until the Armistice on 11 November 1918 is the period known as the ‘Hundred Days’. This was a time of almost constant advance for the allied armies.
Read More ›

Normandy

The Beginning of the End 1944

Normandy intro picture
The Allied Invasion of Normandy on 6 June 1944 marked the beginning of the end for Germany. Codenamed “Neptune,” the Allied landings at Normandy was the key component of Operation Overlord. In one of the largest amphibious assaults ever conducted, 75,215 British and Canadian troops, along with a further 57,500 Americans were landed on the beaches at Normandy, with a small number of Australian army and naval personnel directly taking part.
Read More ›

Okinawa

Attack on Japan 1945

Okinawa intro picture
The Battle of Okinawa, Operation Iceberg, was the largest amphibious assault launched by Allied forces in the Pacific Theatre of operations. On 1 April 1945, Americans began landing on a15 kilometres strip of beach opposite two important Japanese airfields. The land battle lasted 82 days until 21 June 1945 and was hard-won with the allied fleet suffering severe casualties from numerous Kamikaze attacks. A number of Australian vessels, including the destroyers HMAS Napier and Nepal took part in the invasion.
Read More ›

Passchendaele

The Last Gasp 1917

Passchendaele intro picture
By October 1917, the British attempt to push back the German line east of Ypres in a series of ‘bite and hold’ operations had met with some success. However, this had come at a great cost. After 4 October 1917 the rain poured down and the battlefield, and all the approaches to it, became a sea of mud. To successfully bring up heavy war equipment under these conditions proved impossible. However, Field Marshal Sir Douglas Haig, the British commander-in-chief ordered the battle to continue.
Read More ›

Polygon Wood

'Roar of a Gippsland Bushfire' 1917

Polygon Wood intro picture
Polygon Wood was the second of three battles between 20 September and 4 October 1917 in which ‘step by step’ or ‘bite and hold’ tactics were used to batter down the formidable German defensive positions. After an opening bombardment the infantry would advance for a prescribed distance behind a ‘creeping’ barrage of shells. Although the battle at Polygon Wood would end in German defeat, it would come at a great cost to the Australians, who sustained 6,500 casualties.
Read More ›

Pozières

The Battle of the Somme 1916

Pozières intro picture
In late July 1916, the Australians fought their first action in the Battle of the Somme. At this point the British strategy focused on the seizure of the ridge east of Pozières village from where an attack could be mounted on German strongholds further north at Thiepval which had not fallen to British attack on the opening day of the battle, 1 July 1916. By the time the Australians entered the Somme battle the operation had become a series of attacks aimed not so much at a break-through of the German lines as the capture of key positions and the wearing down of the enemy.
Read More ›

Rabaul

Cutting off Rabaul 1914 & 1942-45

Rabaul intro picture
Colonised by Germany in 1884, and surrendered to the Australian Navy shortly after the outbreak of the First World War, Rabaul became the scene of heavy fighting in the battle for control of the South West Pacific in the Second World War. Captured by the Japanese in 1942 and developed as their main naval base for the Solomon Islands and New Guinea campaigns, it was a site of much strategic importance in the defeat of the Japanese.
Read More ›

Ruhr

Bombing "Happy Valley" 1943

Ruhr intro picture
The Battle of the Ruhr was the first of three major campaigns launched by Bomber Command during 1943. Aimed at crippling the industrial heartland of Germany, the offensive opened on 5 March 1943 when 412 aircraft including 33 from No. 460, 466 and 467 RAAF Squadrons raided Essen, a major industrial centre that was vital to the German war machine. From March until July, from 300 to 800 aircraft raided the cities of the Ruhr Valley.
Read More ›

Savo Island

Battle of the Sitting Ducks 1942

Savo Island intro picture
The Battle of Savo Island was naval action fought in the early hours of 9 August 1942 in which the Japanese surprised US and Australian warships sinking four allied cruisers including HMAS Canberra. The devastating effect of the surprise Japanese attack at Savo Island led to it often being referred to as "the Battle of the Sitting Ducks".
Read More ›

Singapore

The Malayan Campaign 1942

Singapore intro picture
Some ninety minutes before the attack on Pearl Harbor, Japanese battalions began landing at Kota Bharu in north-eastern Malaya. British and Australian aircraft, although outnumbered, engaged the invading force but were little match for the Japanese who retained air superiority throughout the campaign. The 8th Australian Division stationed in southern Malaya fought its first significant action in an ambush at Gemencheh (Gemas) bridge on 14 January 1942.
Read More ›

Sunda Strait

The Japanese Invincibility 1942

Sunda Strait intro picture
Sunda Strait, the small stretch of water between the islands of Sumatra and Java was the scene of a number of naval engagements in February and March 1942, including the sinking of the HMAS Perth in February and the HMAS Yarra in March. Many who survived the Japanese attacks became prisoners of war.
Read More ›

The North Sea

The Battle for the North Sea 1940-45

The North Sea intro picture
The battle cruiser HMAS Australia, the flagship of the Australian fleet, joined the British Grand Fleet in early 1915 and spent the rest of the war in the North Sea. Under the cover of the Grand Fleet, the Allied blockade prevented Germany receiving much needed supplies for its war effort. Allied naval and air force operations in the North Sea during WWII were largely an extension of the Battle of the Atlantic, and represented the constant struggle to keep British supply lines clear from the threat posed by German warships and submarines.
Read More ›

Tobruk

The Rats of Tobruk 1941

Tobruk intro picture
Following the capture of Bardia, the 6th Australian Division advanced west along the Libyan coast to the Italian defended port town of Tobruk. At dawn on 21 January 1941, after air and artillery support, the 6th Division broke through the Italian lines in the south and by 8 am the entire division was within the Italian perimeter and fanning out into the enemy enclave. The stiff fighting on the opening day was not repeated on 22 January when 25,000 Italians surrendered and hundreds of artillery pieces and vehicles were captured.
Read More ›

Villers Bretonneux

The End of the German Advance 1918

Villers Bretonneux intro picture
On 21 March 1918, the Germans launched a great offensive against the British forces which withdrew across the 1916 Somme battlefield towards the major city of Amiens. The Australian units were hurried south to help hold back the German advance north of the Somme at Dernancourt and Morlancourt. However German engineers had extended rail communications south of the Somme towards Villers-Bretonneux, close to the key city of Amiens. If the Germans could capture Villers-Bretonneux and reach the edge of a plateau, Amiens would be within range of their artillery.
Read More ›

Wewak

The Australian Advance 1944-45

Wewak intro picture
In 1943, Wewak was the site of the largest Japanese air base on the mainland of New Guinea. It suffered repeated bombing attacks by the United States and Royal Australian Air Forces, most notably on 17 August 1943, when heavy bombing and strafing by 150 Allied aircraft destroyed an estimated 50 percent of the Japanese aircraft on the ground.
Read More ›

Ypres

The Third Battle 1917

Ypres intro picture
In the course of the First World War, five major battles were fought around the Belgian town of Ypres. All five Australian divisions took part in the Third Battle of Ypres, which was in fact a series of battles culminating in the Battles of Passchendaele.
Read More ›
  • © 2025 Department of Veterans' Affairs
  • Privacy Policy